Yesterday I drilled a hole in the top of 2 old pistons and taped up the reed valves.
Then I assembled the crankshaft into the crankcases and bolted on the reed blocks.
Now I am ready to pour some automatic transmission fluid into the crankcase through the hole in the piston with the piston at Top Dead Centre. Note that the crankcase volume is to include the volume of the transfer ports which cannot be done with the piston at Bottom Dead Centre. So I will have to subtract approx. 125cc from each of my 2 volume measurements.
I want to work out if the porting I did on the top left crankcase has made any real difference to the crankcase volume. I am thinking that I will need to fill in the crankcase a bit to get the 2 volumes the same.
As you can see in the photo below; the LH side reed block wall is not the same as the others. I am thinking that I can fill the crankcase volume here to make it match up with the rest.
Thursday, May 26, 2011
Crankcase flow
23rd March 2011
This afternoon I popped out to Tim's and jumped on his "porting bench".
Without really knowing what I was doing I flowed the rear of the (left cylinder side) top cylinder base to achieve nice flow up into the transfers. It was pretty simple and I really enjoyed doing it.
I guess I probably spent about 2 hours just taking my time, faffing about.
25th March 2011
This morning I put the crankcase halves together and placed the barrels on to look to see if I could match up any surfaces to get fractionally better flow.
Mainly the front right cylinder crankcase area where the two halves meet required slight tweakage.
Very hard to physically look at flow from crankcase into barrel.
Also, for an even better job, see the flow work TSRL did on his blog here.
Monday, May 23, 2011
NSR250 MC18 Crankshaft rebuilt
20th March 2011
I am posting this a couple of months late.
My MC18 crankshaft has been pressed back together.
I paid Wob $80 for the 2 big end bearings and owe him a further $200 for pressing the crank together.
NSR250
NSR250 Crankshaft bearings and seals: Availability
Tauranga Massage
I am posting this a couple of months late.
My MC18 crankshaft has been pressed back together.
I paid Wob $80 for the 2 big end bearings and owe him a further $200 for pressing the crank together.
NSR250 Crankshaft bearings and seals: Availability
Tauranga Massage
Thursday, March 10, 2011
New Gold Chain bought off TradeMe.co.nz, NZD$160 + postage
Today I got my new chain. Gold!,.... mmmmmm.
$160 + $6.50 postage = $166.50. Good chains sell on spesh at Cycletreads for about $220, so probably an OK deal?
Saturday, February 26, 2011
Bead Blast Summary
Here is a photo of all the bead blasted bits.
1) Heads
2) Barrels
3) Power valves
4) Reed block backstops
5) Main crankcase
6) Upper Crankcase
7) Right Side Case
8) Flywheel
9) Water pump cover
10) (Not shown) I also blasted the head and barrel nuts, and heads of the crankcase bolts.
I might take a look at the engine mounting bolts and just general other bits to see if they could benefit from a bead blast.
Now I need to make sure I get ALL the bearings and seals.
Note: I did not bead blast the Cassette Gearbox Plate, clutch basket or oil pump as they are either clean, not seen or both. I did not want to bead blast the oil pump as I did not like the idea of filling it with grinding paste.
Bead blasting seems to do a pretty good job on the alloy as long as you use quite fine grade glass beads. However, it is a bit of a pain because you are forced to remove all bearings and seals. Any bearings left in the cases for a bead blast will become full of fine grit and NEED replacing as they will be stuffed.
Soda blasting might be a better option due to it being much more bearing friendly. However, I have not tried this or seen it done.
In particular, it would be nice to not have to remove the two clutch actuator bearings in the main crankcase. These can be difficult to remove and only rotate through a small angle when the clutch lever is used. Therefore they probably are unlikely to ever need replacing. Even if they are 20 years old.
Friday, February 25, 2011
Bead Blasting Finished
Today I loaded up the van with Wobbly's Bead Blaster and some crankcase bits and drove the 37kms to Tims.
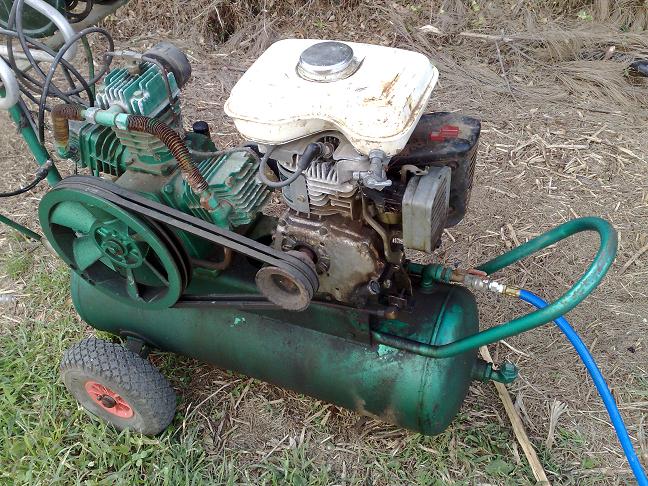
On the way I stopped in at Lorens "Cow Shed' and picked up his petrol driven air compressor.
I also stopped off at Bethlehem Shell station and got 5 litres of petrol for $10.
It was a bit of a mission getting the compressor into the van by myself but luckily I had my bike ramp in the van (a bit of 8"x2" wooden plank) and was able to load it up.
I got to Tim's about 12:30pm and we unloaded the compressor. Tim had been adapting a lawnmower petrol tank to fit onto the compressor, so we fitted that on and filled it up with petrol and got it fired up.
The compressor worked but had a few issues so we spent about an hour getting it to go better. In the end, we settled for turning the fuel tap on until the carby float bowl overflowed. Then turned the petrol tap off. Then pull started it and let it run until it ran out of petrol. Then do that again, ad infinitum.
Loren's compressor turned out to be quite grunty with quite a large tank capacity. This was excellent. Using Dave's little compressor meant being able to bead blast for about 15 seconds and then having to wait for about 2 minutes for the compressor to recharge the air tank. Painful. At least now I could basically continually blast away at very good pressure. Sweet!
So, the previous day, Tim had removed the last 3 bearings from my main crankcase, so it didn't take too long at continuous high pressure to bead blast the case. About 15 minutes in the hot sun.
Today was actually Battle of the Streets at Paeroa, so I should really have gone there with Clinton, but japped out to focus on the NSR engine.
After bead blasting the case, I water blasted to remove the fine grit. I then blow dried it with the air gun. Sweet. I have no photo but see Dave's MC21 case for the basic idea.
Had quite a few beers with Tim during the course of the day and also blasted Dave's MC21 main case.
Left Tims about 7:00pm. It was a bit of a 9 hour mission from leaving my place to returning home, but sometimes ya just gotta persevere! Future bead blasting missions will be MUCH simpler I am sure. Only problem is, I have pretty much finished all the bead blasting I need to do now. Typical.
Maybe one day I will get my other MC18 R6k engine going??
Also, 2 days ago I bead blasted my reed block backstops as they were quite rusty.
I also blasted the power valves: Note that one set of power valves are quite pitted on the face. Maybe that cylinder has seized in the past or summit. I bead blasted Dave's power valves today as well and they were actually much worse than my ones shown here.
Bead blasting continued
Well I have encountered 2 problems so far:
1) The engine is just a bit too big for the bead blaster box. It fits in the box, but it is too difficult to move he spray handle around to get in everywhere. So I will need to reduce the engine shell back down to smaller sub-assemblies and re-mask them off to do it all properly.
2) Dave's air compressor has stopped working. Not too sure what the problem is there, but I will look into it another day.
I did however bead blast the flywheel. It was a scungy looking rusty old thing and now it looks real good. Quite satisfying actually.
A day later now and the air compressor is magically working again.
Subscribe to:
Posts (Atom)