Monday, October 31, 2011

Frame and swing arm cleaned

Yesterday I spent about 4 hours cleaning the frame and swing arm etc.
Also cleaned the linkage parts, the rear brake torque arm and mount and a few other bits.
.

Laundry detergent, petrol, some brushes and steel wool

Came up quite good actually although photo doesn't really show it that well.

Sunday, October 30, 2011

Rolling Chassis Stripdown

Yesterday I stripped down the rolling chassis.
I am going to clean the frame and swingarm and replace the swingarm and rear shock bearings and seals.
I will also clean the rear sub-frame, brakes, footpegs/brackets etc,etc.
I may get race stand lugs welded to the swingarm too.
On re-assembly I will:
 fit the SP suspension front and rear.
 fit the SP rear wheel.
Wiring loom will need to be fitted as well.
Rolling chassis

Stripped down

Swingarm spacer and Locknut
Home made 16mm Allen key and 4-way castellated tool (26mm ID) for threaded swingarm spacer and locknut

Tuesday, October 25, 2011

Engine modification summary


Engine modification summary
Note: this is to be a road and track day bike that will run on unleaded 95 octane.

1) Crankshaft aligned to within 0.01mm tolerance
2) Flowed rear upper crankcase and added material to get TDC crankcase volume equal (593ml).
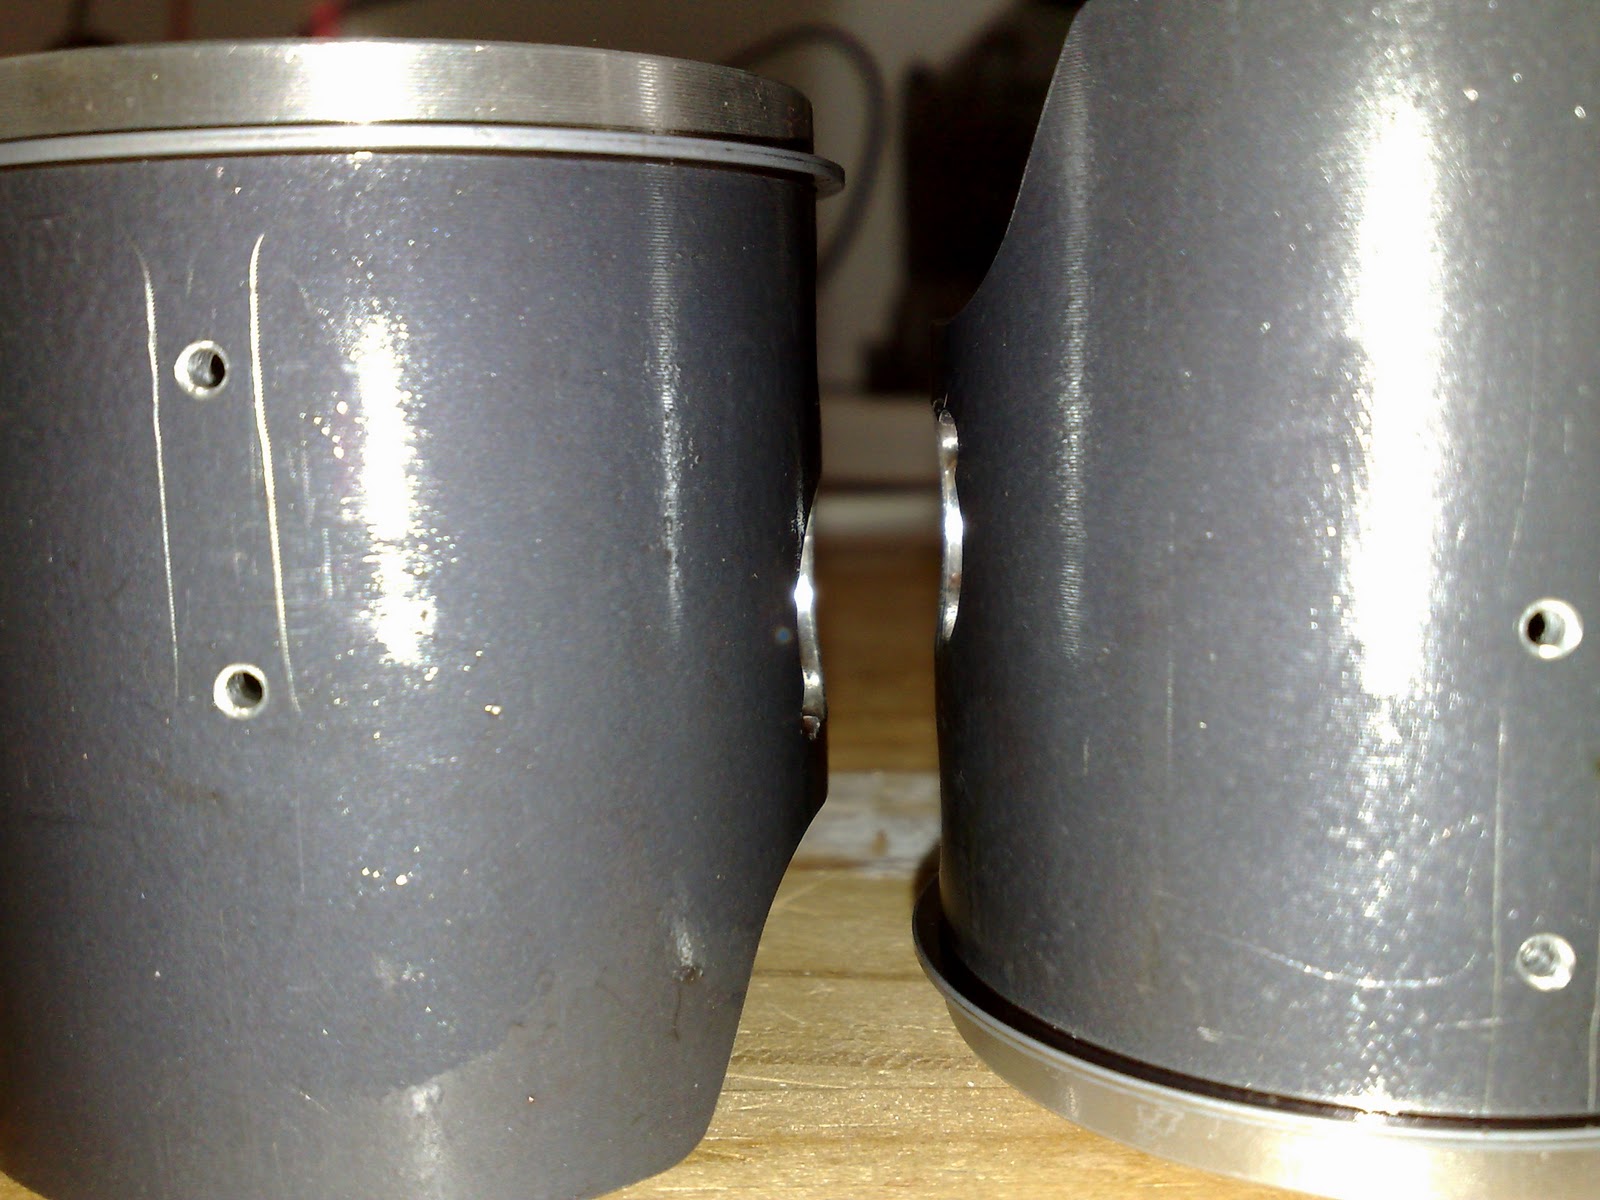
3) Cleaned up transfer port lip edges on barrels to give better flow.
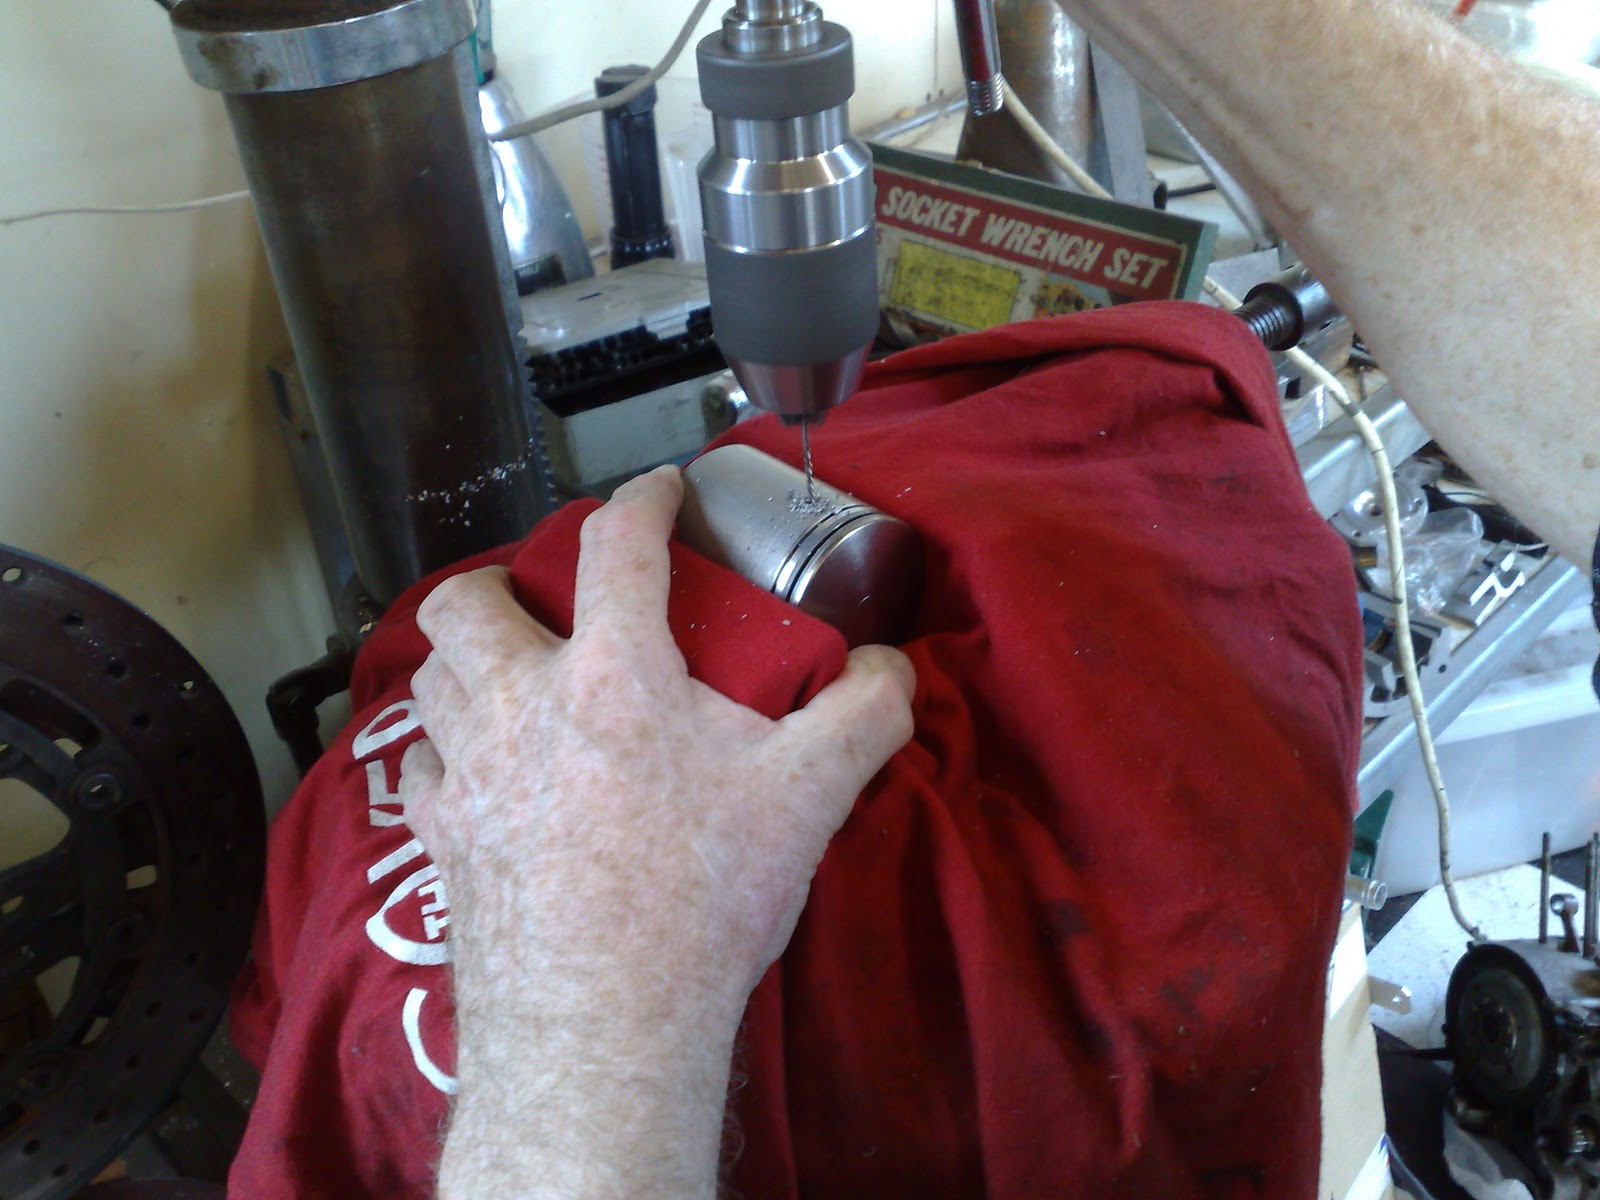
4) Installed 15% lighter Wossner pistons (for 2003 RM125) with 2 holes for exhaust port bridge cooling/lube.
4a) With deck height of RM125 pistons being 0.6mm less than standard, this effectively lifts all ports by 0.6mm or 2.4 degrees at top of exhaust port.
5) Machined heads for 0.8mm squish and 12.8ml combustion chamber volume. Standard is 1.1mm and 13.3ml
6) Installed Mototassinari V-Force III reed blocks.

All bearings, seals, gaskets, and O-rings have been replaced with the exception of the main dry clutch seal.
Most of the visible engine components have been bead blasted with fine grade bead to make them look new-ish.

Yet to be done:
Air box modifications.
Carburetor modifications.
A decent set of expansion chambers and mufflers.
Possibly modify the ignition and/or power valve timing.

Things that could be improved:
1) The main plastic gear for the water pump drive has cracks in it.
2) The lightening holes in the Wossner pistons may not be optimal in terms of flow/harmonics?

Horsepower gained
Well it is impossible to know, but it is fun to optimistically speculate.
Lets start off by assuming that a standard MC18 R5k has 60HP at the rear wheel (RWHP)
Now lets pluck some wildly optimistic numbers out of thin air :-)

Good crank alignment: +0 RWHP
Crankcase flow and volume balance: +3 RWHP (dreamin')
Transfer port clean up: +0.5 RWHP
Wossner pistons. Lighter and ports effectively raised: +2 RWHP
Squish and combustion volume: +4 RWHP
V-Force III reed blocks: +4HP (dreamin')
Dry Clutch on SP model R6k: +1.5 RWHP
Decent set of pipes and mufflers. Haven't got any so: +0 RWHP

This gives an improvement of 15 RWHP taking it to 75 HP at the rear wheel.  Total bollocks!
Ah well, dreams are free.
I will get it on the dyno one day, but until then, it's all bollocks.
Realistically, if I can get 65HP at the rear wheel with standard pipes I will be pretty happy.

Monday, October 24, 2011

Slight mistake: Barrels put on incorrectly

I was around at Dave's with Paul assembling Dave's engine and Paul made me aware of the slightly different way the studs are put into the two barrels.
So today, I had to change the barrels over and put the heads back on. This sort of thing tends to happen when 50 weeks go by between engine dis-assembly and re-assembly
I had to use another base gasket as one of them disintegrated a bit upon dis-assembly.
On the front barrel the 2 long studs are one above the other on the LHS of the bike to take a radiator mounting bracket. See picture for correct orientation of barrels and heads.

Sunday, October 23, 2011

Engine re-assembly completed

Today I finished assembling the engine.
Probably the only thing that I am not completely happy with is the lightening holes milled in the side of the Wossner pistons. I just don't know what effect they will have on the intake gas flow harmonics type of thing.
As you can see from the photo, they will line up with some of the intake ports.

I spent a bit of time trimming the base gaskets so that they do not stick out into the transfer ports and disrupt the flow.


I poured a very small amount of oil down the crankcase holes onto the main bearings to help give them an initial oiling. They are packed with grease from new anyway, so not too sure if I needed to pre-oil them with 2 stroke oil.
I placed a rag under the piston so that the gudgeon pin circlips could not drop down into the crankcases.


As I was fitting one if the gudgeon pin circlips it "pinged" off and appeared to get sucked in to the flywheel by magnetism. So I had to pull the flywheel off. I will just mention that I use an M8 countersunk cap screw placed partially inside the crankshaft thread hole to push against with the puller.
Just to really rub salt into the wound, it took me about 20 minutes to thread the puller into the flywheel on the left hand thread. This was because there was a smattering of extremely fine grit in the flywheel thread from being bead blasted. I had to painstakingly work the puller thread into the flywheel thread in a back and forward motion much like is commonly done when cutting threads with a tap. My patience was being tested here, but I just persevered and was careful not to get too forceful with things.

After pulling the flywheel off, there was no circlip to be found. Arrgh!! On closer inspection, the circlip was caught up on one of the ignition pickups. So I needn't have pulled the flywheel off! D'oh!
Spot the circlip
Care must be taken to get the right head on the right barrel, and also to orientate the head gaskets properly.

All done! Significant milestone reached.
[edit] The barrels need to be swapped over to get the stud patterns right. See next post [/edit]


Another interesting point of note is that there appears to be 2 different types of heads for the MC18.
The 2 left front heads (in the picture) are about 5mm higher than the rear heads, and have one stud hole boss that is 20mm deep with the others all 25mm deep. Casting Number KV3GF and KV3GR (F for Front, R for Rear)
The 2 rear right heads (in the picture) all have 20mm deep stud hole bosses. Casting Number KV3F and KV3R (F for Front, R for Rear)
I have no idea which are newer and or better, but going off the casting numbers, and knowing that "KV3" is very common on many NSR parts, I would have to assume that the larger heads (being 5mm higher) are the later model edition with casting number KV3G. Of course this could easily be wrong.

Friday, October 21, 2011

Holes in pistons for exhaust port bridge

One thing that was supposed to be done yesterday, but was basically forgotten about, was to drill a couple of 1.5mm diameter holes in the pistons to aid with lubrication of the exhaust port bridge. This can be a bit of a problem area, so any help is good I guess.
Drilling 1.5mm diameter holes in std Honda pistons

Slight scratch marks made when piston in cylinder to show where holes must go. 

1.5mm holes drilled in Wossner 2003 RM125 pistons for exhaust port bridge lubrication

Again, slight scratch marks scribed onto piston when in cylinder to show where holes should go.

OK, so now I believe that there is nothing to be done except assemble the barrels, heads, and pistons to complete the motor assembly.
I guess I will do this tomorrow morning.

Finally, after buying the engine online via OkShon Japan on 16 June 2009 ..  I will finally have the engine fully assembled and ready to be put into the frame. It has been 2 years, 4 months and 6 days !!
Of course, due to Okshon being so completely useless, I didn't actually get hold of my engine until Thurdsay 4th November 2010. So in reality it has taken me 50 weeks to get the engine sorted. Not exactly rapid progress I know, but it is happening, and will continue to progress.

Of course, at this stage, the frame is not actually ready to take the engine.  I have been mainly focussed on getting the engine completed and now can finally turn my full attention towards getting the rest of the bike sorted out.
In particular, I need to:
1) clean the frame
2) fit the SP suspension
3) fit the wiring loom
4) get the carby's sorted
5) get some pipes sorted

Once I have done these 5 main tasks, I should be able to fit the engine into the frame and fire it up.

Thursday, October 20, 2011

Setting the squish: Part 2

This morning I picked up the "NSR head to lathe adapter" ring and spacers from the machining shop. Only cost $75 which was half of what I was told it would cost. Win. In order to make it attach to the head, three of the 6 stud holes in the head were tapped M8. It worked a treat.

One point of interest that was bought to my attention by "he who must be obeyed" that I hadn't really thought about:
With the deck height on the Wossner (22.0mm) about 0.6mm less that that of the standard Honda pistons (22.6mm), this means that I am effectively raising all the ports by 0.6mm. I am actually pretty happy with this and will be interested to see how the power delivery comes on as a result. I will probably loose a slight amount of low-end/ midrange and gain a bit of top end. Time will tell. If it is a bit peaky, I can always machine a bit off the bottom of the barrels to get things back to normal I guess.

Just for the record, I am using standard 0.6mm thick base gaskets and standard 0.3mm thick head gaskets.

I am too tired to do a proper write up right now. Its been a long day in someone else's workshop.
I was up at 06:00 and it is now 23:25. Yeah, I'm gettin soft.
Here are some pics though:
Weight of piston assembly with 20mm wide RM125 small end bearing
Head adapter ring for lathe 01

Head adaptor ring for lathe 02

Head before machining


Machining close up

Machining

Squish set at 0.8mm 01

Squish set at0.8mm 02

Squish set at 0.8mm 03

Combustion volume set to 12.8ml to top of spark plug hole

Chamfer on top edge of barrel is non-optimal. probably there to ease the nikasil coating process?
An interesting Fuel vs Squish dynograph here

Wednesday, October 19, 2011

Setting the squish: Part 1

I am currently involved in setting the squish on my MC18 R6k with Wossner 2003 RM125 pistons and a friends MC18 R5k with standard Honda pistons.
With standard base gasket, head gasket, and piston the standard squish is 1.1mm
With standard base gasket, head gasket, and Wossner 2003 RM125 piston the squish is 1.7mm at the bore perimeter and 1.62 at the combustion chamber edge. The difference across the squish is because the Wossner piston dome angle (approx 10 degrees) is different from the standard Honda piston dome angle (approx 8.5 degrees).
[[[Actually, I have got something wrong here when you think about it. I'll double check and get back to this.]]]
So, it seems pretty clear to me that the deck height on the standard piston is 22.6mm and the deck height on the Wossner piston is 22.0mm.
Also, the small end bearing on the RM125 is 20mm wide and the small end bearing on the standard MC18 is 17mm wide. So I need to get 2 small end bearings for the RM125 so as to avoid excessive bearing float along the axis of the gudgeon pin and the small end of the conrod.

The squish is to be set at about 0.8mm. So need to machine off the 0.2mm at the sealing face of the head.
Then need to machine off another 0.7mm at a diameter equal to the bore diameter.
The combustion chamber volume will be the last thing to be machined. The aim is to set it at 12.8cc to the top of the spark plug hole. Measured using a pipette/burette to pour ATF into the cylinder with piston at TDC. ATF = Automatic Transmission Fluid.
Standard MC18 head
Machined MC18 head to give 0.8mm squish with Wossner 2003 RM125 piston.

This is not very easy to do as it is difficult to accurately mount the heads in a 4 jaw lathe chuck. So I am getting a special ring and spacers made to bolt the head to, so that it is easy to mount the head accurately in a lathe for machining.
Adapter ring and spacers to allow placement of head in lathe chuck
Hopefully this ring and spacer will be made by tomorrow (NZ$150) and I can continue with the job of setting the squish.

Saturday, October 1, 2011

Wossner pistons (2000-2003 RM125)

The two pistons from Wossner arrived yesterday. 2000-2003 Suzuki RM125 pistons.
The piston, single ring, circlips, small end bearing and pin weigh 165 grams
The standard Honda two ring piston kit weighs 195 grams.
This is a saving of 30 grams per cylinder, about 15% less than standard.
Wossner Kit. This should say 165 grams. The bearing here is wrong: 2g heavier than it should be.

The 53.97 diameter Wossner piston is part number 8061DC and is sold for around USD$105.
Note that the small end bearing is not included in this kit from Wossner.
Also note the Teflon coating. Well at least I assume it is Teflon?

The Wossner gudgeon pin weighs 32 grams.
The Honda gudgeon pin weighs 36 grams.

The Wossner piston and single ring weighs 123 grams.
The Honda piston and two rings weigh 149 grams.

The deck height of the Wossner piston is 22.0mm
The deck height of the Honda piston is 22.5 - 22.6mm

The dome angle of the Wossner piston is about 10 degrees
The dome angle of the Honda piston is about 8.5 degrees.
Std Honda piston dome angle